How to run open-source Large Language Models (LLMs) locally

The development of attention mechanisms and transformers has significantly advanced the field of natural language processing (NLP) and created large language models, with critical contributions from industry leaders like OpenAI and Meta. OpenAI’s groundbreaking GPT series, including the highly impactful ChatGPT, has demonstrated these models’ practical applications and versatility. Similarly, Meta’s LLaMA and especially open source LLaMA 2, represent another leap forward, showcasing cutting-edge research and diverse applications in natural language processing.

These innovations from OpenAI and Meta not only drive technological advancement but also set new benchmarks in the industry. As a result, each new release of open-source LLMs attracts considerable attention. Enthusiasts and professionals are keen to explore these models in a controlled environment, seeking hands-on experience to understand their capabilities and potential without the burden of complex setup requirements.

LM Studio

LM Studio is a desktop application designed to experiment with local and open-source large language models (LLMs). It’s a cross-platform app that allows users to download and run any ggml-compatible model from Hugging Face. The application offers a user-friendly interface for model configuration and inferencing and leverages the GPU of the device, if available, for enhanced performance.

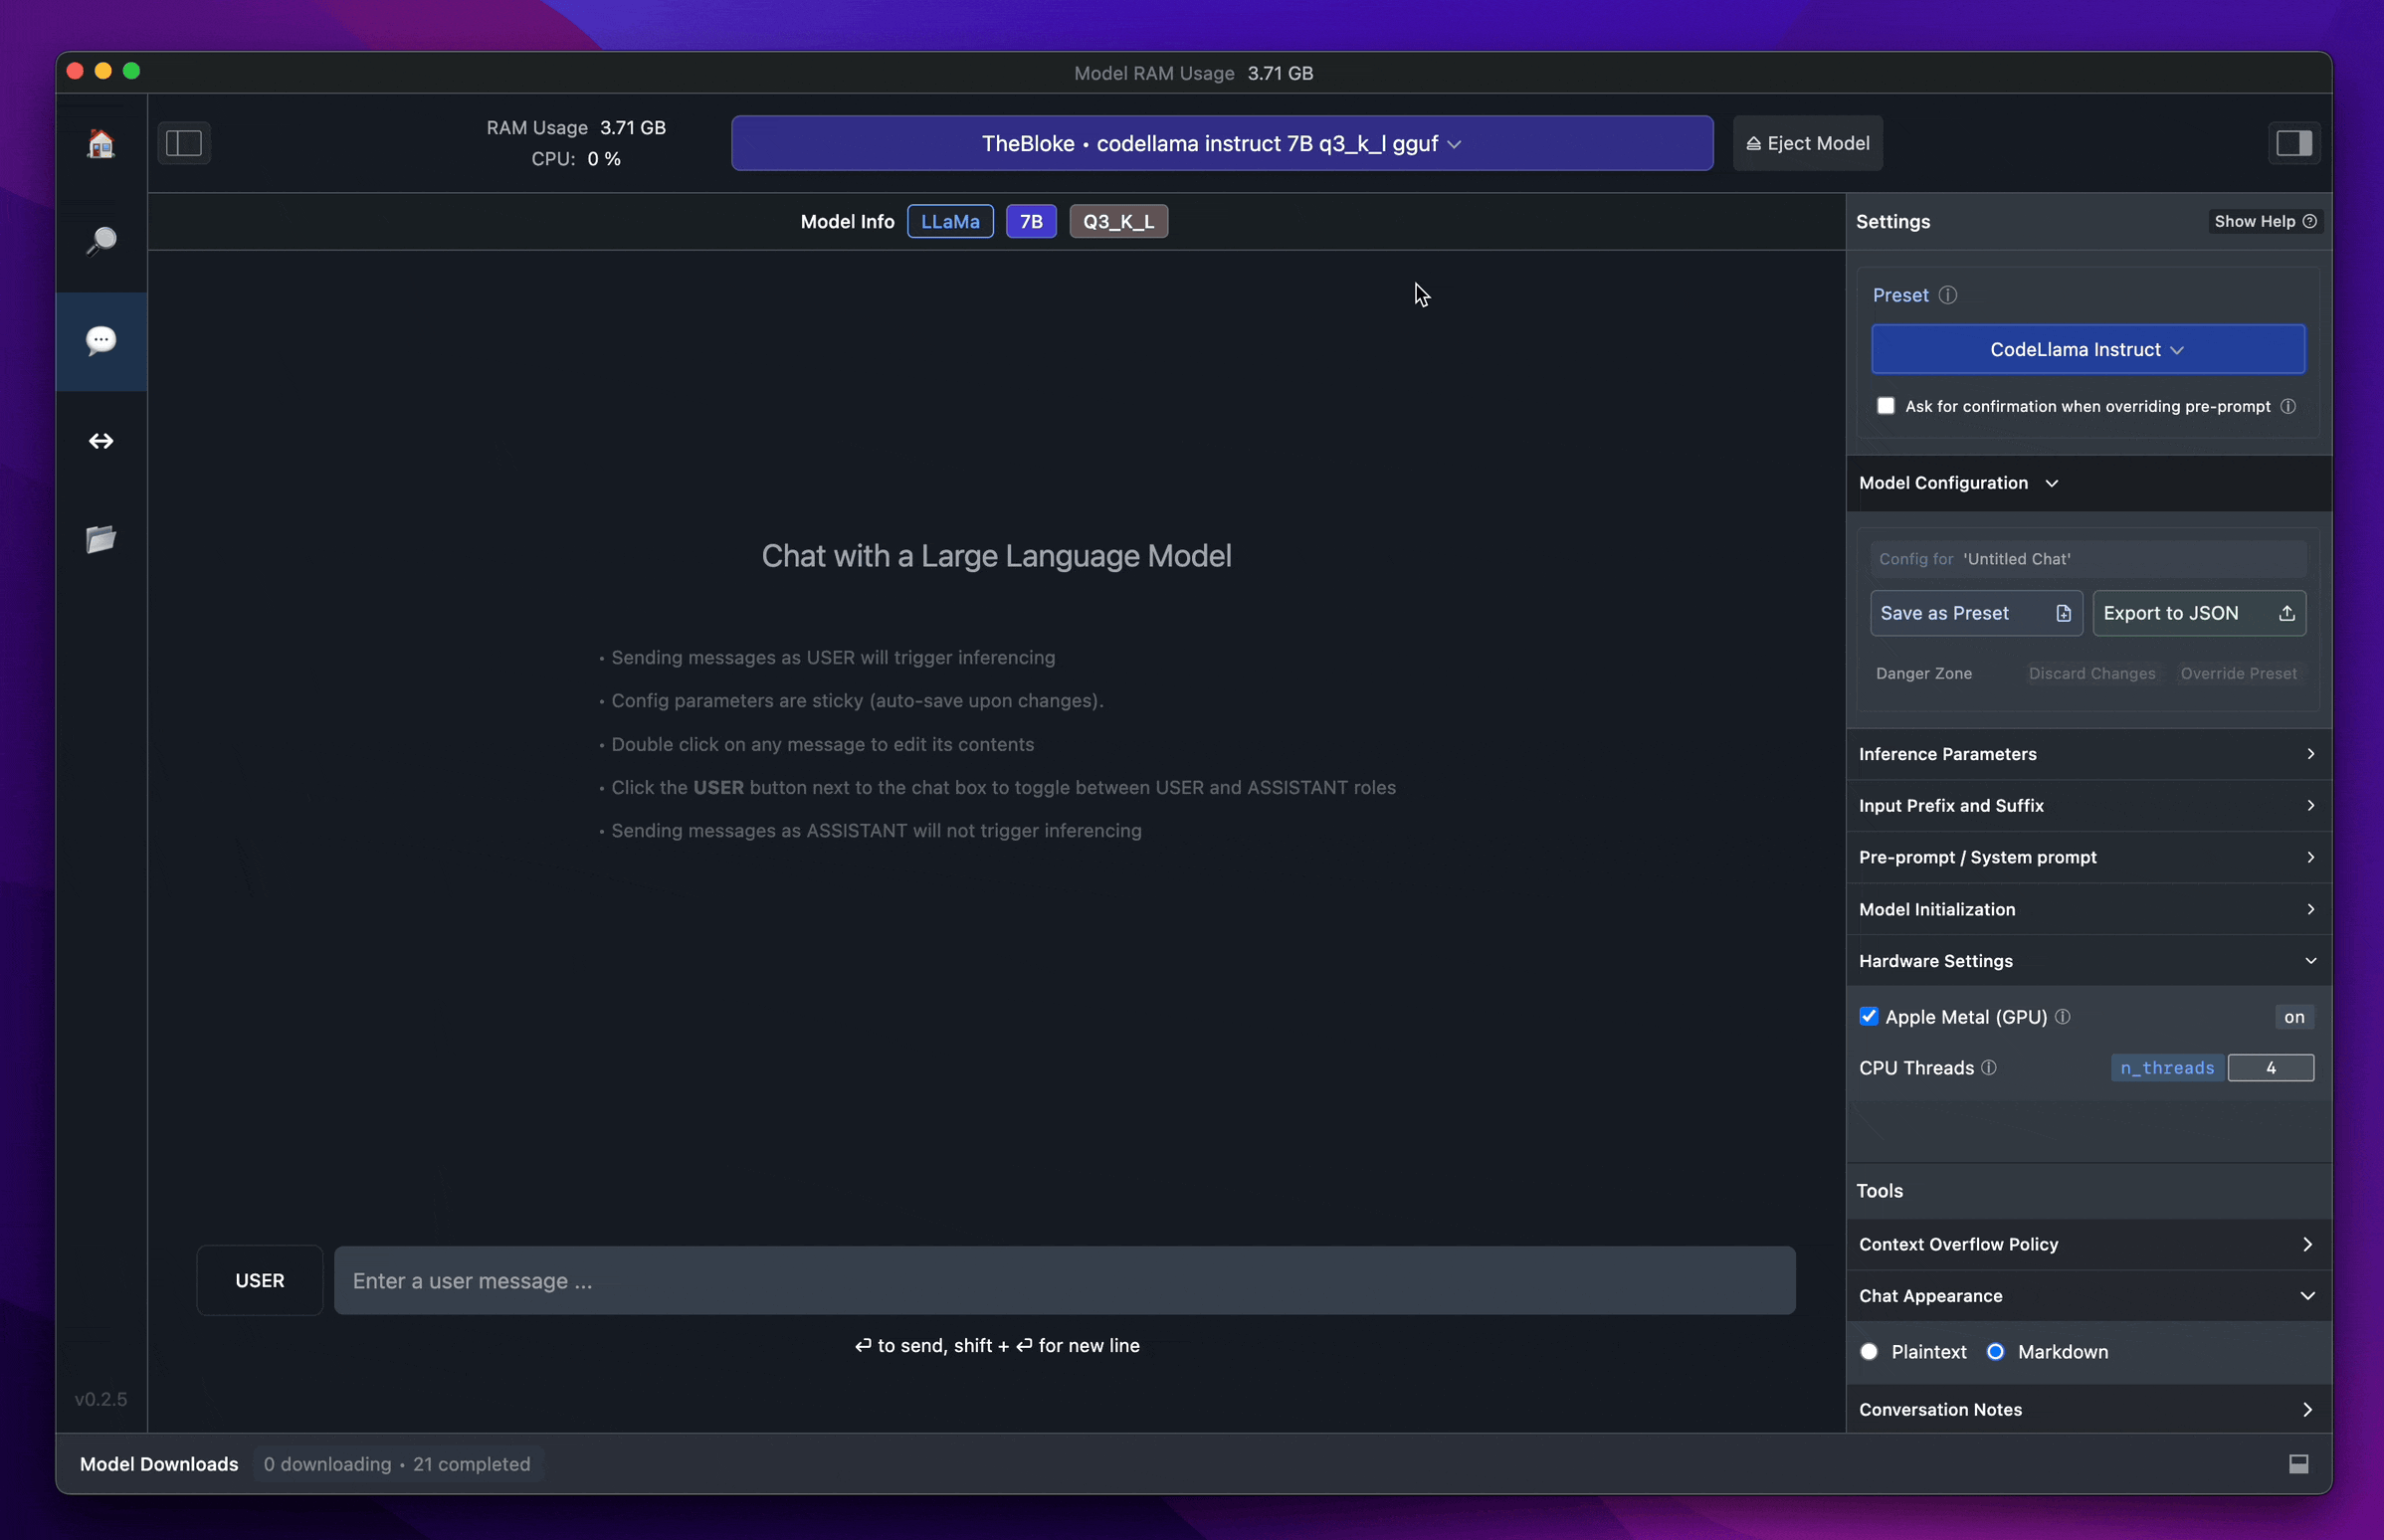
LM Studio is particularly recommended for students and enthusiasts eager for hands-on experience with Large Language Models. Its user-friendly platform is ideal for those who wish to explore and experiment with various LLMs in a practical and accessible manner.

Using GPU for Deep Learning on Linux

It is always better to use a GPU for deep learning. GPU can reduce the training time speed so that we can try different parameters and architecture faster. Unfortunately configuring a GPU on Linux sometimes is tricky. I tried many different methods, and I was not successful with many of them until I found this blog post. it described the process clearly.

Updating Anaconda On Windows 10

Anaconda is the heart of the data science stack. Especially when you want to draft or do some experiments with your data having Anaconda and Jupyter notebook is a big help. We have to update these tools once in a while. To update the Anaconda On Windows 10 you can run this code:

conda update anaconda-navigator

If Conda is not in your path, then you need to use the full path. It is in Anaconda’s main folder scripts:

C:\Users\<Username>\Anaconda3\Scripts

so the code to run would be:

C:\Users\<Username>\Scripts\conda update anaconda-navigator

Don’t forget the replace the <usermame> with your username.

to update all the modules and packages also you can run :

C:\Users\<Username>\Anaconda3\Scripts\conda update --all

to upgrade Python version also you can run:

conda update python

I run the terminal as administrator to prevent any permission problems.

Permission Problem with updating anaconda-navigator on Ubuntu 18.04


I tried to use Anaconda Navigator on Ubuntu 18.04 and I face a simple problem. There are some problems that might look so simple but finding a solution for them might become a time-consuming task especially when you are in a hurry to do your task.

Problem

Today I faced one of those problems. I wanted to update Anaconda  on Ubuntu 18.04 and I got this error:

PermissionError(13, 'Permission denied')

Solution

So I tried to run with just a sudo and it didn’t work. After searching a while I got to this solution which was worked perfectly for both conda and Anaconda navigator.

sudo env "PATH=$PATH" conda update conda

Machine learning for software engineers

This is going to be an introduction to a series of posts on machine learning for software engineers. Since my last post on my blog, my life has changed dramatically. It has been really difficult but so far the result was worth it. One of the interesting thing that turned out to be the result of my study is to push me to learn machine learning and deep learning.

I was a software engineer or a software project manager for the majority of my career and now that I’m doing my PhD research on machine learning and deep learning, I thought it might be a good idea to share my experience here. These notes would be mostly my personal notes to remember what I have learnt during my research.

A Beginner’s Guide To Render a Scene with 3ds Max For Gear VR

I’m exploring the VR(Virtual Reality) world and the possibilities that it’s going to give us as developers to solve problems or create new applications.Here I’m going to share my experiences during this road. In this post, I’m going to render a scene in 3ds Max and view it in my Gear VR with my Samsung S6 Edge.

Let me make it clear I’m not an expert in 3ds Max. I used to work with it more than a decade ago for some simple projects and it has changed a lot since then but still, I can find my way around it.

I should admit rendering for VR is really simpler than I thought.

Setup Gear VR

You need to have a Samsung Gear VR and a phone that works with it. Oculus app will automatically be downloaded to your phone and just follow the steps it needs to make it work.

Setup 3ds Max

First I downloaded the Trial Version of 3ds Max 2017 from Autodesk. The installation was very simple and straightforward.

Steps to render and view

After installation, I run the application for the first time and it gave me a choice to select a template! Awesome! This made my life so easy, no need to create a box and render a plain old 3d box. I picked the “Sample Studio Scene”

Template-Select

The scene is neat and simple. I don’t want to change anything.

Step-one


I searched the google read the help and watched some videos so let’s start.

First, we should select the “Template-Camera-Close” for the current Viewport. This will give us a better view after rendering.Step-Camera

Then we need to open the “Render Setup” Window.

Step-two

In render setup screen I didn’t change anything my renderer by default was “NVIDIA mental ray”.

In the “Output Size” section we should select Custom and set the width to 4096 pix and Height to 2048 pix. the aspect ratio is 2:1.

Step-Three

The last thing, from the “Renderer” Tab we should change the Lens to “WrapAround”.

Step-Lens

And that’s it! now hit the “Render” and be patient. After the render is finished save the image as “.jpg”.

If you don’t want to do all the above steps you can download the final render from here.

Now we should transfer the 360 rendered image to the phone.

we can do it with a USB cable and then copy the image to the phone. There is folder phone base folder called “Oculus” we can create a new folder called “360 Render” inside Oculus folder and copy the .jpg file there.


Now put your “Gear VR” on and go to “Oculus 360 Photos” you can find this file inside “My Gallery”.

Enjoy your lovely creation in Virtual Reality world.

My next sample will be a simple Unity app for Gear VR.

Crystal Report .net object data source From Business Layer

To add a DotNet object to  Crystal Report as a data source from Business Layer you should do a simple procedure.

Why I needed it? I’m working on an old project of mine. It’s a WinForm project and I’m updating it to WPF and adding more layers to the architecture of the project. In my old project I connected the reports directly to SQL server but now I have a Business Layer that use a Data Access Layer to connect to the database. I still want to use my old Crystal Report Reports but feeding them with Business Layer Services. and using the models there. and I store all of my Reports in a Report Project. so here comes the trouble.

If your model is in the same project It’s easy to add it as the data source. but if it’s in another project (like Business layer) it’s a little bit tricky.

Open your Database Expert and Under Create New Connection Select Ado.Net XML and then Create a new Connection

Then You enter the class full name on Class name box and you’re done.


Working hard, No blogging

It’s been almost a year since my last post. my life has been changed a lot since my last post. the most important thing that has happened to me is that now I have a lovely daughter and I’m enjoying the amazing feeling of being a father.

I have done lots of projects during this year but currently I’m working on 4 main projects. Two of them are in WPF and Desktop and the other Two are  Asp.net MVC and web based. I’m enjoying doing all of them and learning lots of stuff while I’m doing them so I’m going to share my experience about these projects here, basically for  myself to remember what I have done and also it might help other developers also.

I’ll try to have a post each week and I really hope my next post won’t be a year later.


Problem of running Mspec tests with Resharper after updating

Problem

After I updated mspec I tried to run my testes that used to work fine….
it turned out all of my tests were not running….
I got this error:
Method not found: 'System.String Machine.Specifications.Result.get_ConsoleOut()'.

after searching the web I found this post on stackoverflow. I cleaned the solution… Rebuild it…and nothing worked.

Solution

As it mentioned on the Stackoverflow post the problem is mismatching the referenced dll on the project with the dll which is using by the runner…
after 1 hour banging my head over the wall I tried to uninstall the Mspec resharper runner re-install it again.
I’m using Resharper 7.1 so I went to %APPDATA%JetBrainsReSharperv7.1Pluginsmspec…cleaned up everything… then copy Machine.Specifications.dll and Machine.Specifications.ReSharperRunner.7.1.dll from the Mspec folder to the plugin folder.

My tests are back to life…